"Captain, you may find that you are not nearly clever enough to deal with what lies ahead for you"
Sometimes an OP event comes along which really throws you into a spin. Encounter at Farpoint is one of those OP events.
There are four, equally irritating, Q effect cards - two of which are in effect each turn, chosen randomly. They can slow you down, they can disable upgrades, they can even flip your captain face down.
Choosing a fleet for this OP was beyond painful - do you go with as many ships as possible, take multiple fighters or take heavy hitters and leave the rest up to chance?
I think I went through somewhere between 15-20 different lists, encapsulating 3-4 different playing styles ranging from ultra defensive through to tech stealing and overtly offensive.
In the end I went with the following:
I.K.S. Maht-H'A [28]
- Khan Singh 7 (Captain) [5]
- - Remata'Klan [4]
- - Fire! [4]
- - Additional Phaser Arrays [4]
- Shroud [1]
- Corak [2]
Ship Total: 48 SP
Reman Starship (Reman Warbird) [36]
- Jean-Luc Picard 9 (Captain) [7]
- Mendak (Admiral) [4]
- Charging Weapons [1]
- Romulan Security Officer [2]
Ship Total: 50 SP
Klingon Starship (Vor'cha Class) [26]
- Karr 8 (Captain) [6]
Ship Total: 32 SP
Fleet Total: 130 SP
I essentially wanted to hit as hard and as fast as I could, hoping to eliminate as much of the opposing fleet as early as possible to negate their chances of hitting me back. The Reman Warbird at CS12, Karr at CS8 and Khan with a CS7 raising to CS12 in the correct circumstances would hopefully give me that edge.
The prize ship for this OP was the U.S.S. Hood - I think one of the most sought after OP prize ships, along with maybe the Avatar of Tomed and Assimilation Target Prime. Have to say - I really wanted the Hood, more than anything else I wanted to have at least one game where my "Cunning Plan" worked.
Well, the day arrived and with five players in attendence the odds were quite reasonable although I was a tad nervous about this one - How would Q affect my build? Would my chances be scuppered before my ships hit the table? Only one way to find out...
Game 1 vs Klingons (primarily):
The opposing fleet consisted of two Vor'cha class ships, a K'Vort and a Hideki attack fighter squadron.
Not entirely sure which named ships they were, by this point I was questioning everything about my build - time to get into it!
The fleets faced off against each other and as turn one kicked in Q played his shenanigans and I just cloaked my ships (I know!, I used ships that could cloak!) and slowly advanced towards each other.
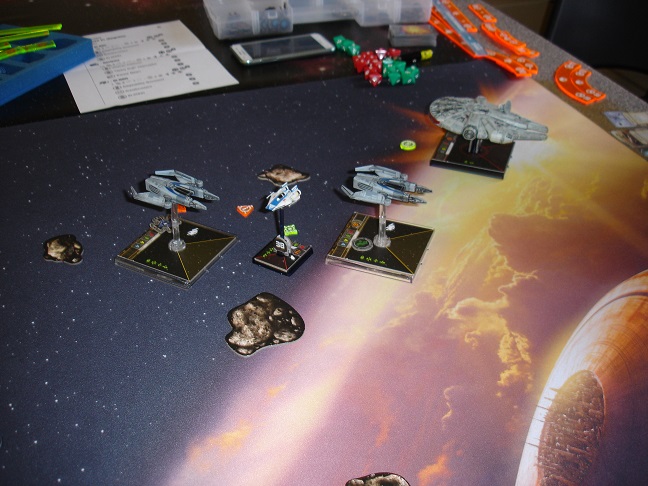
At the point that the ships reached each other, I revealed Khan's upgrades and assaulted the core of the Klingon fleet. After the first round of firing, one Vor'cha and the K'Vort were gone, in return the Reman Warbird suffered a warp core breach - overall, barring one lucky hit, a very successful opening attack:
The roll for warp core breach at the beginning of the next turn was luckily not a critical so it survived long enough for me to eject the core and drop my speed to one for the remainder of the battle. My next target was the remaining Vor'cha, which fell in the next round of firing. The Hideki's were now the only remaining opposing ship, and they kept on trying to finish off the Warbird. A couple of turns later and after some come about manouvers, they fell to concentrated fire from my Vor'cha and the Maht'Ha:
So, one game down and a clean sweep, 130-0. So far, my fleet had worked as I wanted it to - fire first and hit hard. It effectively won me the game on the first round of firing, leaving my opponent with few options and an uphill battle.
Round 2 vs Romulans:
Ah, the Romulans! My usual foe - last time we met in battle I came off slightly the worse for wear; how would I fare against this variation? No Valdores, no Prototype... I was already concerned. Then I noticed the Avatar of Tomed, Donatra on the science ship, and some form of Interphase Generators on both of the Warbirds. The Algeron was tacked on with Tal for the Battlestations action. Also - cloaked mines on the science ship. Primary target identified.
Both fleets closed and cloaked, I had to get rid of the Talveth - if I got caught with all of those dice from the Avatar and Haakona I was toast. Thankfully Q helped me out a bit with this one - disabling the right upgrades at the right time. The first round of firing was very telling - the Talveth was destoyed and the Avatar took heavy damage, in return the Reman Warbird was damaged but not heavily.
Again, Q helped me out here - forcing all ships to move at speed one or take damage. This placed the Avatar directly in the line of fire of my entire fleet, very soon it lost its last hull point and it left the following ships still in play:
At this point I was feeling pretty comfortable, surprisingly Q had made my life much easier, slowing everyone down had played right into my hands.
The next round of movement took place and ships ended up in the following positions:
The Haakona was in the front arc of all of my ships - the Reman Warbird hammered it, leaving it on very few hull points - Karr's Vor'cha was next to fire, instead of hitting the Haakona I opted to attack the Algeron, bringing its remaining shields down. Khan then finished off the Haakona. The following round Q slowed us all down again, the only ship with a shot on was the Algeron:
Again, it fired at the Warbird, damaging it but with the Warbird's defence value negating the majority of the attack it was safe enough. In the final couple of turns, even though Q once again slowed us down, I took the risk with the Maht'Ha and performed a come about:
This placed the Algeron in range, Khan fired and the Algeron fell.
So, second game complete, a second win 130-0. I was now in a good position going into the last game - win or lose I just had to score enough points to make sure I was in the top half of the results table.
Now, before I go any further, whilst making my list for this OP I bounced a little idea off a comrade-in-arms. Essentially, it was to take three Olympic class starships and three Hideki attack fighters. Put Donatra and Hayes on the Olympics to bump up their attack values and essentially go to town with them. You couldn't ignore them and you couldn't ignore the attack fighters. In the end, after much debate and hilarity, we decided that yes it could be effective and variations with other ships were possible, but I ruled it out - I've used attack fighters in every OP bar one so far so wanted to avoid them.
Round 3 vs The Swarm...
As above, so below:
Yeah. I knew I was in trouble.
My one, slim hope was that my opponent had split his fleet. I had two options - take on the Xindi, the Connie and the Federation attack fighters on the right or the Connie, the Federation attack fighter and Hideki on the left.
To do as much damage as possible I chose to attack the squadron on the right - the Xindi and the Connie were the softer targets and if I could finish them off I would at least be in a reasonable position at the end of the game. I knew that I couldn't do enough damage to finish off every ship - this was all about damage limitation.
Q, oh Q, how you vex me. Early in the game, Q assisted me greatly - slowing everyone down to speed one for the first three turns or so.
When the fleets were finally close enought together to fire, the result was as follows:
One Connie gone, the Xindi down to one hull point and no real return damage - I could not have hoped for better.
At the other end of the mat:
Ah, Q, you wonderful omnipotent trickster you!
Over the next couple of turns, the Xindi ship was destroyed and the Federation attack fighters were reduced to their last hull point.
Q now struck at me - flipping over my captains and allowing my opponent to fire first in this round - this was going to hurt...
At this point, I will refer you to my past exploits with attack fighters assisting in one-shotting large targets. I have done this on a good few occasions now, they are exceptionally effective. I had, up until this game, not been on the receiving end of such an attack. Well, that has now changed. Way back in the Wrath of Khan OP, I almost wiped out my current opponent's Borg Sphere with one shot - let's just say the favour has now been returned:
The Reman Warbird was reduced to a single hull point in one attack - it was then finished off by the Federation attack fighters, who were in turn eliminated by the Vor'cha.
Shortly after, Khan was eliminated and I was on the run. Karr's Vor'cha managed to evade enough damage to survive until time ran out.
So, a loss, 61-98.
A very hard fought game and the only reason I had any chance at all was because my opponent had split his fleet at the start - had they been together I would have been wiped out at about the round five mark. No doubt at all in my mind of that either! The combination of three sets of attack fighters and three standard ships is exceptionally effective. It can be beaten, but you would have to have at least an equal amount of shots being fired as you were receiving. At the end of the day, it was a well thought out, well played victory to my opponent.
Final standings on the day:
1st Place - The Swarm
2nd Place - Myself
3rd Place - Romulans
4th Place - Federation
5th Place - Klingons (Primarily)
So, 2nd place, which meant that the Hood was coming home.
More importantly, another good day of gaming with a great set of opponents. It was very interesting to see an alternative viewpoint on many of the builds that were seen throughout the day, the only fleet I didn't play against was a three ship Federation build using two Galaxy class ships and a Prometheus whose games were against the Romulans and The Swarm - both really tough match-ups.
Overall I was very happy with the way that the fleet played, it performed exactly as I wanted it to in the first two games, firing first and multiple times before my opponents definitely had the desired effect. It was nice to see a true swarm fleet as well - confirming my thoughts about them, definitely viable and definitely effective.
Well, until next time, hope you enjoyed this report and thanks for having a look!